I INSPIRED AND THEY SHARED followers projects

Two of my followers have sent me their
BEFORE and AFTER pics
of painted furniture they were brave enough to take on.
*J* you did a fabulous job redoing this sideboard.
This is why I do what I do. This piece has a new life and is newly loved.
Thank You so much for sharing this save with me and my readers.
I gave *T* some pointers before she started this beauty.
I think they worked, its stunning.
Tomorrow Ill show you what I did to this chandelier:
Sharing with:
Read More..

HOW TO LINE A DRAWER WITH WALLPAPER part 1


BEFORE                                          AFTER
 
With 5 cuts and 10 folds you can have this ...
 
 
Part 1 shows you how to cut and fold,
Part 2 will teach you a unique way to adhere it.
Start with your drawer upside down.
 
 
Cut your paper long enough to cover the bottom and sides - Cut 1
 
 
Next fold the sides tight to the drawer sides - Fold 1 & 2
 
 
Turn your drawer over and lay your folded paper inside.
 
 
Decide how far up the front and back you want your paper and crease it - Fold 3 & 4
 
 
Remove the paper from the drawer and cut the 4 corners,
One straight cut to the front and back crease you just made. 
 
 
You can see below the cuts that make your corners - Cut 2,3,4,5
Note: The paper is curling showing you a triangle, it is just straight cuts.
Paper back in the drawer fold the 4 corner flaps down - Fold 5,6,7,8
Lift up the 2 side panels.  
 
 
Fold over the excess paper hanging over the top of both side - Folds 9 & 10


There is your pretty drawer liner. 
 
 
Part two will show you a unique way of
adhering non pasted wallpaper. 
 
Part two can be found here
and this wallpaper can be purchased here
Other tutorials can be read here
Showing this how to at:
Read More..

My First Time Using Annie Sloan Chalk Paints

Well here goes....my first post!As a lover of paint, it only follows that my first post is about, yes, you got it....PAINT!  Now, there is a lot one can say about paint but Im going to start by talking about what is all the rage in painted furniture right now, Annie Sloan Chalk Paints.Annie Sloan Chalk Paint is a line of paint developed by, ok you got it again, Annie Sloan, a decorative painter and author who lives in England. A great description of the chalk paint comes right from her website at anniesloan.com and follows below:

"About the Chalk Paint

Painting with our paint should always be a pleasure.
Annie Sloan developed her now famous Chalk Paint to answer the need she had for a paint which would have many uses from acting like limewash to looking like old painted furniture and that had a good range of colour that could be extended by the user. This paint is very easy to work with and allows people to be creative as one doesnt get involved with the technicalities of preparation and it also allows you to change your mind without hassle."
The first thing I have to say about Annie Sloan paint is that the color palette is delish. Soooo pretty and very french. I choose for my first colors the Paris Grey and Original (a warm off white). I also purchased the clear and dark wax and the large brush.  And let me tell you, spring for the brush! Its amazin! For my first project, I wanted to tackle something small and manageable so I got workin on fixin up a mirror from an old bedroom set and let me tell you, I am just lovin it (sounding a bit too country, think?).So here are my project how tos:
  • With Annie Sloan paint(ASP), they say you dont need to prime, which is music to my ears, so just paint it on like you would with a latex paint and your favorite paint brush.
  • Great Annie tip, dont even bother with taping a mirror or window. Just use a piece of scrap paper to move along the edge as you paint. 
  • Great coverage and dry time! ASP covers great so I only needed one coat with a light second and it dries so quickly you can do several layers and wax in a day!
  • After paint was dry, I sanded my piece to distress with a 100 grit sanding block. Then, I sealed the painted mirror with the clear wax (which is your top protective coat) using Annies wonderful big brush. I worked in sections and added some dark wax here in there for some antiquing. NOTE: Annie says sand after waxing. Why? This is because it keeps the dust down. However, I found that I like to sand after paint is dry and before waxing, despite the dust, because I like to sand, step away, sand more, and then sometimes I want to go back and paint over an area that is too distressed or whatever it is that is bothering me and I dont want the wax. I wait until I have my project mostly completed before I wax.
  • The finished product....beautiful!
Old oak mirror from a bedroom set, pretty blah!
Upstyled mirror with Annie Sloan Paris Grey
Read More..

Vintage Ammo Boxes

Hey there all!  I wanted to share with you some photos of a vintage ammo box that hubby found the other day in a storage building he won in a silent auction.   I really liked the stencil on the box, as well as, the wood and the rope handles.  It had a somewhat beachy look to it so I put it in our living room on our white desk turned console table that I built.
The inside said something about cannons so Im assuming it contained cannon balls at one time.  I really like the shape of the box and it doubles for storage, too.  
It would be perfect for TV remotes, if we had a TV in there.  :)
Plus, Im loving the wood accents with the white colors I have in the room.  
 Arent the rope handles pretty cool?
This is another similar box we have that belonged to my dad.  
I love the pale blue color, the chipped paint and the dovetail corners.  I also think its pretty cool that it has my birth month and day on it, May 20.  I was not born in 1940 though. :)
I also like the metal hardware.  My hubby uses this box to store his smaller found treasures 
which I think is perfect for such a special box.
Have any of you come across these kinds of boxes?  What do you use them for?
Read More..

Christmas Sneak Peek

Im in the middle of decorating for local Christmas Tours and dont want to share too much here just yet but couldnt resist sharing a little....
My hubby brought home this little cedar tree and I thought it would be perfect for this empty space in the kitchen.  I simply adorned it with some of the wood gift tags I made.
And as you can see, Im a jar person.  I love decanting all my dry goods into pretty vintage jars.  The more the merrier.  :)
 The two vintage paintings I actually found in a dumpster.  I was so drawn to them so I snatched them up and gave them a home in my kitchen. 
I was so excited to decorate the dining room this year.
The chippy red bench was also found by my hubby and I thought it was perfect for Christmas and our home in its less than perfect condition.  (Sorry for the sun glaring in the photo)
I love using things from nature to decorate so these walnut tree stumps definitely got to come inside for the season.  I sanded them a little and sprayed them with a clear gloss.
And heres a little peak at our stairs.  I usually never share them because I dont like the staircase.  I dream of having a beautiful stair rail but for now, we dont.  I was inspired by Carlas stair project last year so I did my own version this year with one of my dads favorite Christmas songs.
Thats it for now!  Ill share more soon!
Take care!
Follow along between posts on Instagram!
Read More..

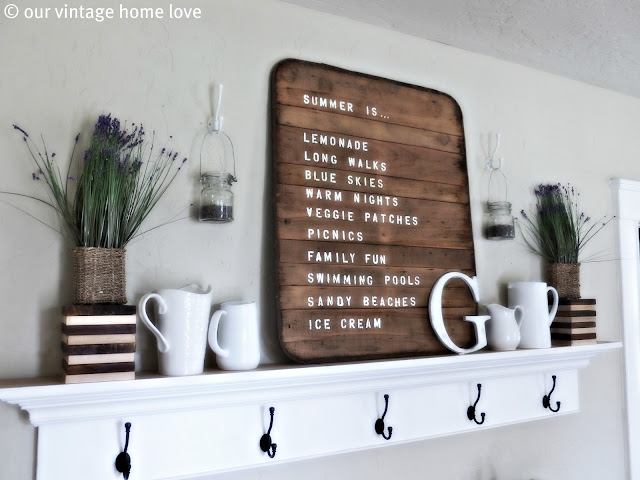
Spring Summer Mantel Ledge

Hey friends!  Yep, Im late to the Spring Mantel party, but better late than never, right?  I decided to decorate our ledge for both Spring and Summer because, lets face it, I dont have time to do it again in a month.  So here it is....
My starting off point was this amazing green colored soda crate that hubby brought home not long ago and I just went crazy for the color!  That crate kinda inspired the rest of the look, with my main color theme being green and white.
I always try to research the things that my hubby brings home, however, I couldnt find much on this crate, or what K.C. Love is.  If anyone knows what it is, do share!  I kinda went with a picnic theme, too, and brought out a couple of picnic baskets from my picnic basket collection.  I love them as much as I love ironstone and bread boards.  They just make me happy and remind me of fun things I get to do with my hubby and kids, past and present.  :)
I picked up this adorable metal green picnic basket not long ago.  I went nuts for the wood handles combined with the green metal.  Ive never been a fan of the all metal variety but this one, with the lovely wood handles, was calling my name.  Love it!
For my main piece of art, I decided to make a sign with this wood/metal thing-a-ma-jig hubby found during Christmas.  We dont know what it is.   It started out like this....
But I decided to give it a new look by sanding it down and stenciling some of our favorite things about summer on it with a vintage set of stencils, also from hubby.  So, now it looks like this...
Everything else, I already had around the house.  I pulled out my favorite ironstone pitchers to display because I love the crisp white color and to add a little farmhouse vibe.  The basket vases of faux greenery, I picked up at a yard sale last year.  I gave them height by placing them on alternating maple and walnut wood scraps that I already had and just cut into squares.  
I made the jar candle lanterns with some old jars I had and wire from the hardware store.  I filled them with fragrant lavender and little tea lights.  Rather than hang them on the hooks on our ledge, I hung them above.  I just thought they looked better there.  Im hoping to find a summery vintage bag to hang from those lower hooks soon.
Im totally happy about this Spring/Summer look!  Im loving the green inspired by that wonderful crate!  And because its finally Spring!
Wishing you all a wonderful Spring!
Read More..

SAVE MONEY my screw drawer

Something I find very handy and saves a great deal of money on screws is my screw drawer.
I dismantle a great deal of furniture and when I do this I keep all the screws and other misc. hardware.
All the screws go to the screw drawer where I have an old cookie sheet that spreads them out.
When I need screws for another project I can simply search back and forth over the tray
and find what I need.
Read More..
Detailed look at distressing and antiquing