I picked up this drop leaf on a visit to a local estate sale. I had been wanting to do one for awhile and the price was right. this is a Duncan Phyfe -Style....notice I said Style.....I did a little research and got some info from an antiques expert. Antique is usually something of at least 100 years old.
And Duncan Phyfe was a furniture maker in the early 1800s. If you actually have a Duncan Phyfe anything, its probably 180+years old! So, anything made later than that in his style, is a knock-off.


Here are the two items I got. The little guy was refurbed with the nautical compass.
 This wood refinishing was pretty straightforward. After sanding, I applied Varthane dark walnut gel.
The body got a coat of home made chalk paint using DE "lambswool".

And heres what I ended up with....
 |
| sigh....i know,,,its off-center...... |


 This is one of our three koi ponds. The outside of our house is a Mediterranean/Spanish style and this pond is in the front patio/courtyard . I had the wall stuccoed and then painted it this vibrant cobalt. The rest of the house is a rich gold with hints of terra-cotta. I know a lot of people just cringe at these colors. But hey, I love bold! My yard is filled with flowers and plants with vibrant foliage. Im just coordinating with nature!

 Cobalt color
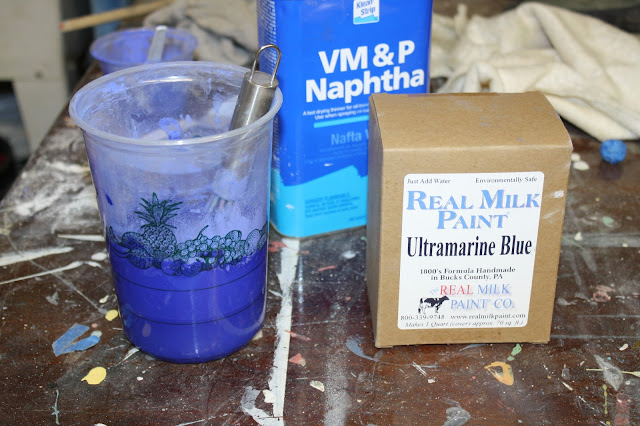
 Painting with milk paint is almost identical to chalk paint. Im used to mixing my homemade chalky paint, so mixing this was no biggie. Simple directions. The rep at the company told me it will keep in the refrigerator for a few weeks. It will thicken, so just add some water before using. Good to know!

 |
| "Judy" was kind enough to model the before and after drawers. |
 So. This is the second coat. The first coat was, um, scary. The wood just soaked it up. I had an "oh-oh" moment. Until I read that is normal. The 2nd coat goes on like a thick latex paint and you can actually see the color. It dries just like chalk paint.
Here is the top after one coat of paint and sanding.

This is during the 2nd coat. Just so you know, Milk Paint will not "fill in" any cracks or divots, you must apply wood filler to those prior to painting.

This paint dries super fast. You can seriously knock the whole thing out from start to sealing in a few hours. Instead of sealing with wax, the manufacturer recommends natural tung oil (or their burnishing paste). Its completely non-toxic, same as the milk paint.
Tung oil is very thick so I thinned it with their citrus solvent (also non-toxic) to make it spreadable. You can use mineral spirits if you want, but that will remain toxic until the spirits evaporate. Its the same with the paste wax. The solvents are added to make the wax pliable. After the solvents evaporate, you are left with your hardened wax.
Tung oil is very thick so I thinned it with their citrus solvent (also non-toxic) to make it spreadable. You can use mineral spirits if you want, but that will remain toxic until the spirits evaporate. Its the same with the paste wax. The solvents are added to make the wax pliable. After the solvents evaporate, you are left with your hardened wax.
 |
| After applying the oil, the color deepens. They recommend 3-4 coats of oil. This was one. |
The oil goes on very easily. You put on a thick layer, let it soak in for about 30 mins, and wipe off.
Depending on how porous the wood is, will determine how many coats of oil. Its a lot easier than waxing. However, you can still apply a coat of wax over the oil finish if you desire a more polished appearance. If you look at their website, they give you how-tos on their products.
Depending on how porous the wood is, will determine how many coats of oil. Its a lot easier than waxing. However, you can still apply a coat of wax over the oil finish if you desire a more polished appearance. If you look at their website, they give you how-tos on their products.

The tung oil is great for many things. It revives any type of wood. The tung oil they sell at Real Milk Paint company, is 100% pure oil. I know you have all seen the tung oil, Danish oil, etc, at HD or Lowes,,,read the label,,,it says tung oil finish, Danish Oil Finish.....very little if any natural tung oil or Danish oil. That stuff is filled with solvents and other nasty smelling stuff. Dont ever use that finish stuff inside of drawers. The smell will transfer onto clothing or whatever you are keeping inside. 
This was not the mirror that came with the dresser. I had this from a previous piece and the owner
did not want it.

I played around with the other two colors I ordered. I painted them on first and then layered over
both with the ultramarine. When I sanded, I got peeks of the turquoise and cobalt (they call it
cobalt but it looks like aqua). These pics really dont do it justice. The layering effects are
gorgeous!
 I will be lining the drawers with this fabric.
I wanted to get a few pics without the mirror.


If you are wondering if this color has been photoshopped,,,the answer is no. This is really
what it looks like. Definitely not for the faint of heart!
what it looks like. Definitely not for the faint of heart!

Adios Muchachos!
Thanks for visiting. linking to all my faves below
FunkyJunkInteriors
Read More..
FunkyJunkInteriors
My First Time Using Annie Sloan Chalk Paints
Well here goes....my first post!As a lover of paint, it only follows that my first post is about, yes, you got it....PAINT! Now, there is a lot one can say about paint but Im going to start by talking about what is all the rage in painted furniture right now, Annie Sloan Chalk Paints.Annie Sloan Chalk Paint is a line of paint developed by, ok you got it again, Annie Sloan, a decorative painter and author who lives in England. A great description of the chalk paint comes right from her website at anniesloan.com and follows below:
Annie Sloan developed her now famous Chalk Paint to answer the need she had for a paint which would have many uses from acting like limewash to looking like old painted furniture and that had a good range of colour that could be extended by the user. This paint is very easy to work with and allows people to be creative as one doesnt get involved with the technicalities of preparation and it also allows you to change your mind without hassle."
The first thing I have to say about Annie Sloan paint is that the color palette is delish. Soooo pretty and very french. I choose for my first colors the Paris Grey and Original (a warm off white). I also purchased the clear and dark wax and the large brush. And let me tell you, spring for the brush! Its amazin! For my first project, I wanted to tackle something small and manageable so I got workin on fixin up a mirror from an old bedroom set and let me tell you, I am just lovin it (sounding a bit too country, think?).So here are my project how tos:
"About the Chalk Paint
Painting with our paint should always be a pleasure.Annie Sloan developed her now famous Chalk Paint to answer the need she had for a paint which would have many uses from acting like limewash to looking like old painted furniture and that had a good range of colour that could be extended by the user. This paint is very easy to work with and allows people to be creative as one doesnt get involved with the technicalities of preparation and it also allows you to change your mind without hassle."
The first thing I have to say about Annie Sloan paint is that the color palette is delish. Soooo pretty and very french. I choose for my first colors the Paris Grey and Original (a warm off white). I also purchased the clear and dark wax and the large brush. And let me tell you, spring for the brush! Its amazin! For my first project, I wanted to tackle something small and manageable so I got workin on fixin up a mirror from an old bedroom set and let me tell you, I am just lovin it (sounding a bit too country, think?).So here are my project how tos:
 |
| Old oak mirror from a bedroom set, pretty blah! |

 |
| Upstyled mirror with Annie Sloan Paris Grey |
 |
| Detailed look at distressing and antiquing |
