Hey there! This past weekend our local downtown area had their Holiday Open House. All of the amazing businesses participated and we were thrilled to be a part of that since our shop is now located in this beautiful area.
I dont know about you but I absolutely love decorating for Christmas and decorating our shop was just as much fun as decorating our home. I really wanted the Holiday decor to reflect who we are and what our shop is so I put a lot of thought into it.
I really wanted to create a Christmas tree that was unique but vintage and industrial so I told my hubby to keep his eyes open on his picking trips for something that we could repurpose into a tree.
He definitely didnt disappoint, though he never does. I woke up one Saturday morning to find this sitting in the back yard.

At first I thought to myself what the heck is that doing in the back yard? So, I asked him what it was for and he told me he thought it was the perfect Christmas tree shape. Perfect!
Heres what I turned it into....
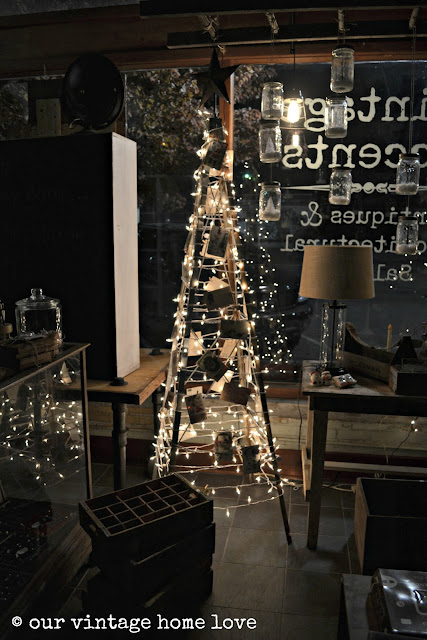
I wrapped the entire base in white wedding lights and then attached lots of vintage Christmas and Thanksgiving post cards from 1900-1904 with tiny wooden clothes pins. Each card has actual messages written on the back from the sender and reading all the sweet sentiments from a time gone by makes them even more special.

For the star, I bought two metal barn stars from our local farm store, glued them together and then cut out a small hole in the bottom with metal cutters, then inserted a small dowel rod and glued in place with hot glue. Then I inserted that into the hole that was already at the top of the base that held the part of the wind mill that blows around, and it fit perfectly. It was the perfect Christmas tree to represent our shop.

For the other tree on the table, I wanted to keep it very understated, natural and simple so I placed it inside a vintage wooden egg crate, wrapped it in very wide burlap ribbon, added lights and a vintage wooden star topper. I love the look of the tree sitting in the crate.
To add to the decor, I decided to make my own snow globes, so, I rummaged through our storage and found a case of old Kerr canning jars.

To make the snow "globes", I sprayed the inside of the jars very lightly with spray snow and let dry. To do this, make sure to keep the jar quite a distance from the spray snow or you will end up with globs of it on the jar instead of a light mist. I placed the jars on the ground and then stood above them and sprayed, letting the "snow" fall into the jars.
I found some little mini street lights in the Christmas miniatures section of the craft store. I hot glued each one to the bottom of the jar and then covered with fake snow, not the spray snow. Next I spray painted the jar lids with antique brass spray paint. To give the jars a sparkly effect, I sprayed the lids with silver skin glitter spray that I found in the Halloween costume section.
After everything was dry, I drilled a small hole in the center of each lid and threaded a piece of hemp twine through the hole, knotted it, and then hung in varying heights from a very old wooden ladder that we hung from the ceiling. I absolutely loved the look. Very magical and who doesnt love tiny scenes inside jars.


I also made a few with tiny white Christmas trees, also found in the same section of the craft store. You could also find these in the play train section.

I have to admit, the lamps are my favorite.....


I had so much fun decorating but even more fun at the Open House. I spent the night before making cookies and caramel apple cider for our customers.

Throughout the afternoon, we literally had 100s of people come in and we felt so blessed. It is such a joy talking with our customers and finding out what special treasures they are looking for. Finding those treasures is very important to my hubby.

It really couldnt have been a better day. :)

A very special thank you to all our customers who visited us and who continue to return to our little shop. This new adventure we are on has exceeded our wildest expectations and that couldnt have been possible without YOU. Many, many thanks!
P.S. If youd like, you can follow along with our shop, as well as, find info such as the location and hours by liking our Vintage Accents Facebook page. :)


 The little brass studs were solid black. They shined up pretty durn good!!


 Linking up to all my faves, see below......plus http://www.myrepurposedlife.net/</a>
 So glad I didnt! Im in love with how these colors turned out!
 When he got it home I thought, "Good Lord! What the heck can I do with this?" Most of the guides of the drawers were gone and the bottom drawer fell apart when I took it out.


 Heres the natural wood color. It wasnt in good enough shape to leave it, so I decided on very distressed look. Ive been wanting to try some different colors and I figured since I only spent 15 bucks, if it didnt work out, no biggy! So I made my own chalk paint again and used Martha Stewarts "yam" mixed with some other orange and golden yellow. I just coated the whole thing with that color and then went over it in MS "Hosta" mixed with "plumage" and a little green. I used a sanding block and went to town.


 I lightly dry brushed the top with the paint (I had already refinished and applied a seal coat)


